Step 1.
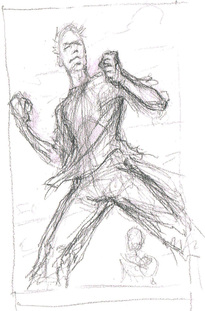
We want to show our followers and friends the process for creating Page 2 of Issue 1 of “Forgotten City,” from the first rough sketches to the finished piece. Following Bryan J.L. Glass' script, Dan created this preliminary breakdown. Breakdowns are based on a script and typically are rendered quickly. Since this artwork takes up the entire page, there was no sequential art to be thought through.
We want to show our followers and friends the process for creating Page 2 of Issue 1 of “Forgotten City,” from the first rough sketches to the finished piece. Following Bryan J.L. Glass' script, Dan created this preliminary breakdown. Breakdowns are based on a script and typically are rendered quickly. Since this artwork takes up the entire page, there was no sequential art to be thought through.

Step 2.
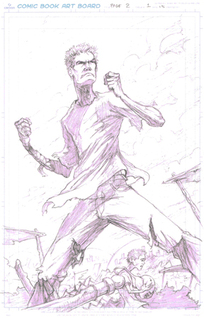
The second step of the process for creating Page 2 of Issue 1 “Forgotten City,” is penciling the artwork. The image is transferred and enlarged to an 11x17-inch illustration board. At this stage, the details of the breakdown are tweaked. Light source, shadows, and composition are all refined and polished. Background art and storytelling elements are also added. This is the penciler’s final work before handing the illustration over to the inker.
The second step of the process for creating Page 2 of Issue 1 “Forgotten City,” is penciling the artwork. The image is transferred and enlarged to an 11x17-inch illustration board. At this stage, the details of the breakdown are tweaked. Light source, shadows, and composition are all refined and polished. Background art and storytelling elements are also added. This is the penciler’s final work before handing the illustration over to the inker.

Step 3.
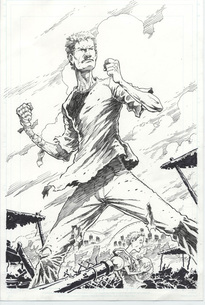
Here is the inked rendering of the art on Page 2, Issue 1 of “Forgotten City” by Pat Broderick. “Inking” is the third step of the process in creating the final comic book artwork. After a piece of art has been penciled, it is passed on to the inker. It is the inker’s job to take the refined pencil sketch and trace it in black ink to produce a well-defined, finished black-and-white piece of art, ready for the colorist.
Here is the inked rendering of the art on Page 2, Issue 1 of “Forgotten City” by Pat Broderick. “Inking” is the third step of the process in creating the final comic book artwork. After a piece of art has been penciled, it is passed on to the inker. It is the inker’s job to take the refined pencil sketch and trace it in black ink to produce a well-defined, finished black-and-white piece of art, ready for the colorist.

Step 4.
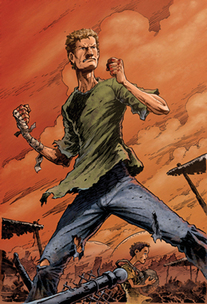
Coloring is the final step in creating the Page 2 art for Issue 1 of “Forgotten City.” Colorist Jamie Hood does a fantastic job setting the book’s mood and tone. Utilizing Photoshop, Jamie creates several layers as he adds highlights, shading, depth, color, etc., giving the book its final look and feel. When this step is complete, the artwork is ready for the addition of word bubbles ... and the page is finished. Please share this post with your friends and ask them to “Like” us on Facebook. “Forgotten City, Issue 1” is available for download on Comixology.
Coloring is the final step in creating the Page 2 art for Issue 1 of “Forgotten City.” Colorist Jamie Hood does a fantastic job setting the book’s mood and tone. Utilizing Photoshop, Jamie creates several layers as he adds highlights, shading, depth, color, etc., giving the book its final look and feel. When this step is complete, the artwork is ready for the addition of word bubbles ... and the page is finished. Please share this post with your friends and ask them to “Like” us on Facebook. “Forgotten City, Issue 1” is available for download on Comixology.
